This guide is going to teach you how to become a Scrapebox master, so brace yourself. For years the SEO community has been needing one true ultimate Scrapebox tutorial, however, no SEO has been brave enough to see it all the way through. At first, I thought it would be impossible to complete. But then five weeks and 9,000 words later it was finally here, enjoy everyone.
Contents
Chapter 1: Introduction to Scrapebox
If you are experienced with Scrapebox then please feel free to skip straight to other sections, but for the complete newbies out there we will walk through everything. Ok, so you have downloaded and installed your copy of Scrapebox (this can be done locally or on VPS). It is now crucial that you purchase a set of private proxies if you are going to do some serious scraping.
Update: Scrapebox Discount Code for $40 off
If you don’t already own SB, here is the Blackhat World $40 off discount link that most people don’t know about. Simply go to Scrapebox.com/BHW and the price will automatically have the $40 off coupon code applied.
What are proxies and why do we need them?
A proxy server acts as a middle man for Scrapebox to use in grabbing data. Our primary target Google, does not like it when their engine is hit multiple times from the same IP in a short time frame, which is why we use proxies. Then the requests are divided amongst all the proxies allowing us to grab the data we’re after.
So pick yourself up a set of at least 25 private ScrapeBox proxies. Personally I use 100 but I go hard. Start with 25 and see if that works out for you. Get acquainted with the Scrapebox UI. It can be quite intimidating at first, but trust me, after some time you will become very comfortable with the interface and understand everything about it.
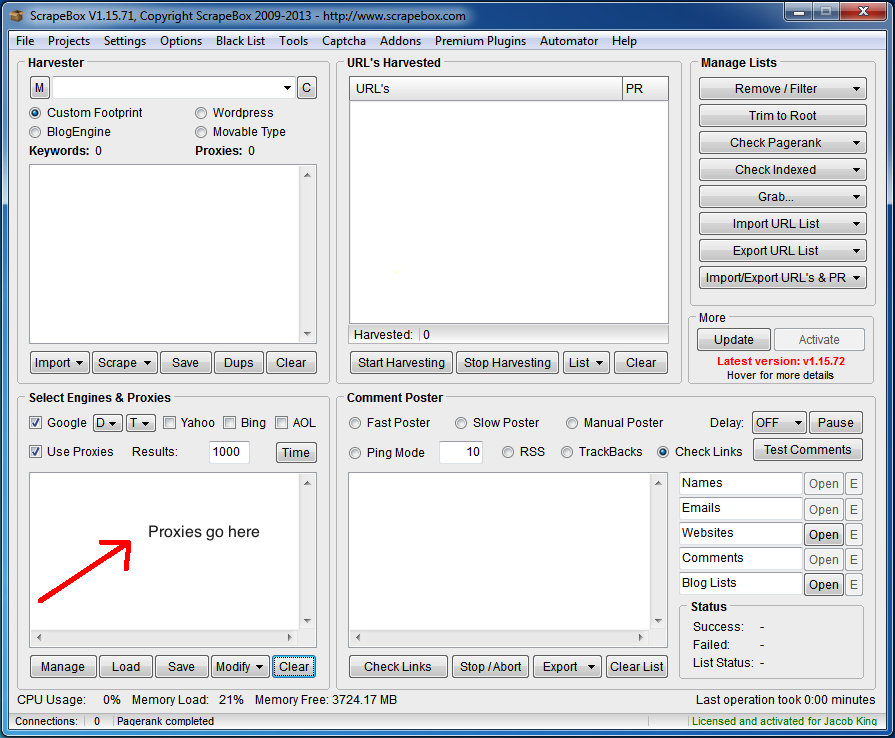
See the field where it says “Proxies go here”? That is where you paste in your proxies.
The required formatting is – IP:Port:Username:Password
Depending on your provider you might have to rearrange your proxies so they follow this format. If your proxies don’t have passwords attached and are activated through browser login, then just enter the ip:port portion after logging in.
Then we will click manage.
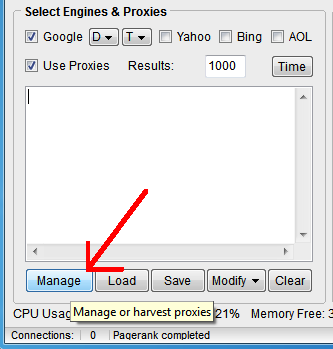
Now the proxy test screen will pop up and we will click “Test all proxies“.

If everything is good to go, you will see nothing but green success and Y for “yes” on the Google check. This is crucial! If your proxies aren’t working, you are dead in the water. So make sure you use a reliable provider with quick proxies, otherwise this is going to be a useless endeavor. First click the filter button and then “Keep Google proxies” to remove any bad proxies.
Good proxies are everything when it comes to using ScrapeBox effectively, so invest in a set from SquidProxies if you’re serious about scraping.

Now click “Save to Scrapebox” and it will send all your working proxies back to Scrapebox (if they are all working just close).

Ok. So our proxies are good to go, now for our settings.
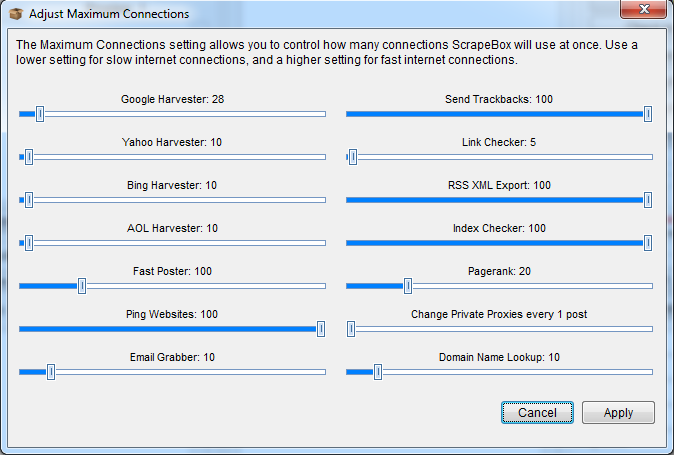
Everything is good at default for the weekend scrapers out there. If you want to turn the heat up then go to “Adjust Maximum Connections” under the Settings tab. From here you can tweak the amount of connections used when hitting Google under “Google Harvester” settings. The amount in which you can push depends on the amount of proxies you are using. I usually run 100 proxies at 10 connections, do the math. But also keep in mind the number of connections allowed depends on the type of queries you are doing. More on that in a minute.
For a massive list of footprints all using site: operator, you should turn it down. i.e. the Google index check.
And to learn more about proxies, here is a comparison of the top providers I recently ran.
Chapter 2: Building Footprints
What is a footprint?
A footprint is anything that consistently come up on the webpages you are trying to find in the search engine index.
So if you are looking for WordPress blogs to comment on, the text “Powered by WordPress” is something very common on WordPress blogs. Why is it common? Because the text comes on the default theme.
Bingo, we’ve got ourselves a footprint. Now if you combine that with our target keyword then you can start digging up some WordPress blogs/posts in your niche. And yes, we will go way more in depth but for now understanding this simple example will be enough.
Good footprints are now your best friend as a Scrapebox user. Building them is very simple but takes some focus and attention. This is where you’re going to be better then the average Scrapebox user. If you are any type of white hat link builder then you have certainly used some sort of footprint before, you just might not have called it a “footprint”.
Have you tried searching out guest post opportunities or link resource pages before? You are using footprints.
But in this section we are building footprints and for strategic reasons. We will build sets of footprints and use them again and again for specific purposes. As a quick side note let me remind you that replication is one of the keys to success in SEO, so let’s build some badass footprints and start using them over and over again.
Fortunately I have included a massive list of footprints categorized by target platform that I’ve spent years digging up. They are enclosed below.
Once you understand the goal, building footprints is quite simple. Pull up some examples of the target site you are trying to find. Looking for link partner pages? Well bring up a handful that you can find and open them in a bunch of tabs. Compare each one and look for consistent on page elements.
See a phrase that comes up all the time? You might have yourself a footprint.
And if you haven’t yet, and you call yourself an SEO, become an expert with advanced Google search operators.
This knowledge is key to being an effective search engine scraper. So take some time, study, and become a search modifier guru. Then apply that to your footprint building and build some killer prints.
There are two main elements to hunt for when building footprints.
Either in the url structure or in content somewhere.
Here are my goto operators.
inurl:
intitle:
intext:
How to Test Footprints:
After you think you’ve created a footprint testing them is incredibly simple. Just go Google them!
First note how many results come up. If it’s under 1,000 your footprint sucks.
We are trying to create footprints that will dig up tons of sites based on platform so the number should be decent.
Comb through the results and see how much honey your footprint is finding for you. See a bunch ofthe site types you’re searching for? Good, bank that footprint and continue build more. Save your footprints with titles for their specific purpose, so say “Vbulletin Footprints” for finding Vbulletin forums. Now that you have some footprints ready, let’s move on to massive scrapes.
Chapter 3: Massive Scraping
Now you may or may not know what you’re looking for, so let’s get a ton of it.
If you want to scrape big, you’re going to have leave Scrapebox running for a good amount of time. Sometimes even for several days. For this purpose, some may opt for a Virtual Private Server or VPS. This way you can set and forget Scrapebox, close the VPS, and go about your business without taking up resources on your desktop computer. Also know that Scrapebox is PC only but you can run it with Parallels. If you do run SB on Parallels, be sure to increase your RAM allocation. Hit me up if you need some help getting a VPS set up.
Here’s are the different elements you need to consider with big scrapes:
- Number of proxies
- Speed of proxies
- Number of connections
- Number of queries
- Delay between each query
With the default settings everything should be golden, so the determinant of how long your scrapes will take will be mainly on how many “keywords” you put in.
You can change the number of connections – This depends on if you are using private or public proxies, and how many working ones you have.
As I mentioned before I usually run with a set of 100 and set my Google threads to 10.
The keyword field in Scrapebox is where you paste in your keywords and merge in your footprints.
Merging is very simple. All we are doing is taking what ever is listed in scrapebox and merging it with a file that contains the list of our footprints, keywords, or stop words. So say taking keyword “powered by wordpress” and merging it with “dog training” to create.
“powered by wordpress” “dog training”
Ahh yes, this Scrapebox thing is starting to make some sense now.
Now we’re after some urls from some of our favorite search engines, which one is up to us.

See how only Google is checked? This means Scrapebox will only harvest urls from Google. If you want to hit the other engines just select them. Also be sure that you have Use Proxies checked.
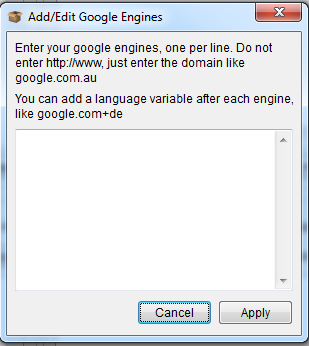
Note: You can also add foreign language Google engines by clicking the dropdown and “add more google“.

Simply add the extensions for the languages you are going for and click save.
The final thing to note before starting is the Results field.
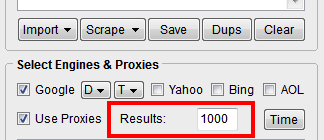
Very straight forward, this is the number of results (or urls) Scrapebox will grab from the specified search engine(s).
Depending on your goals, set this accordingly. If I am scraping for some sites to link out to in some of my link building content, I will only go 25 results deep for each keyword. But if I am trying to find every possible site out there for a certain platform I will do 1,000. And this brings us to our next problem.
What if our query yields more than 1,000 results?
This is where merging in stop words comes into play.
Manually try the query “dog training” “powered by wordpress”.
You will see there are over 500,000 results.

Now see what happens when I add the word “there”.

Besides that stupid Lynda.com ad, the organic results are different now. By using stop words combined with our footprints we can effectively scrape deeper into Google’s index and get around that 1,000 result limit.
Don’t worry, you can download my personal list of stopwords by sharing this guide below. Keep reading!
Once you have some quality footprints and stop words ready, the rest is easy. We’re going to let Scrapebox rip and come back when complete. If you’re running on your desktop then scrape overnight to minimize downtime on your system.
After Scrapebox is complete you will see the prompt saying Scrapebox is complete.
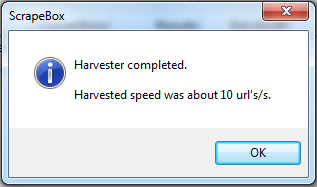
Now if you stop the harvester prematurely a prompt will appear showing you the queries that have been successfully run and the ones that have not.

Non-complete queries can mean one of two things.
1. There were zero results for that query.
and
2. That query has not been hit yet.
If you want to complete this harvest later then be sure to export “Non-Complete Keywords”and set them aside. If you inputted a list of 10,000 queries, stopped after 2,000, then you just save the remaining 8,000 queries for later.

One of the keys to massive scrapes is understanding that Scrapebox only holds 1,000,000 urls in the urls field and stacks files in the “Harvester Sessions” folder.
For each scrape, the software will create a time stamped folder containing txt files with each batch of 1,000,000 urls. And this is great but if you don’t know about Duperemove then you are burnt.
Duperemove is an amazing free add-on from Scrapebox that allows you to merge list of millions of ulrs and remove dupes and dupe domains. This way we can run massive scrapes and process the resulting URLs.
We can also use Duperemove to split a massive file into smaller files so we can further process the resulting urls. We can take 100,000 urls and split them into ten files with 10,000 urls for example.
After finishing a massive scrape, open dupe remove.
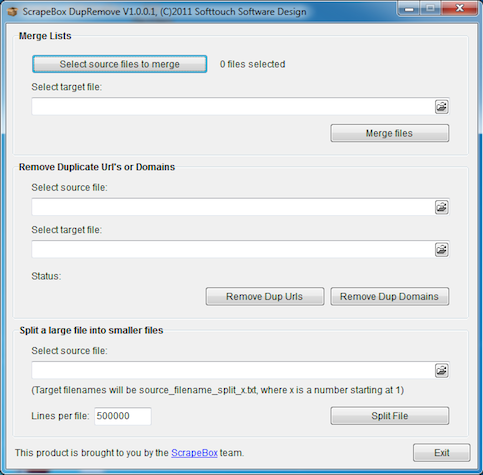
Start by clicking “Select source files to merge” and navigating to your harvester folder with your batch files of 1,000,000 URLs. Also be sure to save the urls left in the Scrapebox harvester when stopped, and put this file with the rest of batch files.
Select all the files and give the output file a name, I like to call it “Bulking up”. Now click “Merge files”.
Duperemove will merge everything into one enormous txt file so you can then remove dupe urls and dupe domains.
Below the Merge lists field, select the previous file “Bulking up” and chose a file name for the new output, I like to call it “Bulking down” .
Then click Remove Dupe URLs and Remove Dupe Domains. Now you have a clean list of Urls without duplicates. Depending on what you have planned for this giant list I will use the split files tool and split the large file into smaller more manageable files.
And now that we have covered everything about footprint building and massive scrapes, let’s move onto keyword research.
Chapter 4: Keyword Research
Having fun yet? Now that we’ve gotten all the introduction shit, things are going to start getting good.
With keyword research Scraebox continues to be one of my “go to” tools. It has two main weapons; suggesting tons of Keyword suggestions and giving us Google exact match result numbers.
Keyword Research Weapon #1 – The Power of Suggestion
With this method we will be using Scrapebox to harvest 100s or 1000s of suggestions related to our keywords. Then we will use the Google keyword tool to get volume and move on to our research weapon #2.
First we will explore the suggestion possibilities and how the keyword scraper works.
Start by clicking the Scrape dropdown, and then Keyword Scraper.

Now after you get the keyword scraper open, type in the keyword you would like to scrape suggestions for.
Next you can select the sources you for which the scraper will grab for suggestions.

Protip – Tick the YouTube box if you’re doing keyword research specifically for YouTube videos. Searches can be very different on Youtube compared to typical Google queries.
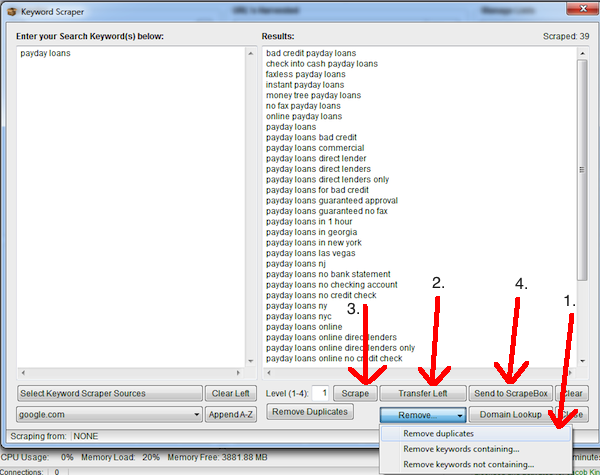
After you have finished the first run through scraping keywords, remove duplicates, and then you have two options.
You can send the results straight to Scrapebox and move on or you can transfer them to the left and scrape the resulting keywords for more suggestions. You can repeat this process over and over again until you get the desired amount of keywords. Scrape, remove dupes, transfer left, scrape again, crack beer. It’s actually quite enjoyable.
So now that you have keyword scraping/suggesting down we will move on to one of the simplest and most powerful free addons for Scrapebox. If you haven’t yet, click “addons” in the top nav, then “show available addons”. Now install the Google Competition Finder addon.
Keyword Research Weapon #2 – Google Exact Match Results
After you open the competition finder the first step is to import the keywords from Scrapebox. Click Load Keywords and Load from Scrapebox.
Also be sure that the Exact match box is ticked. This way Scrapebox will wrap your keywords in quotes and get the exact match results for each. You can also change the number of connections for large keyword lists but I would recommend keeping it at the default of 10. Give your proxies a chance to breath.
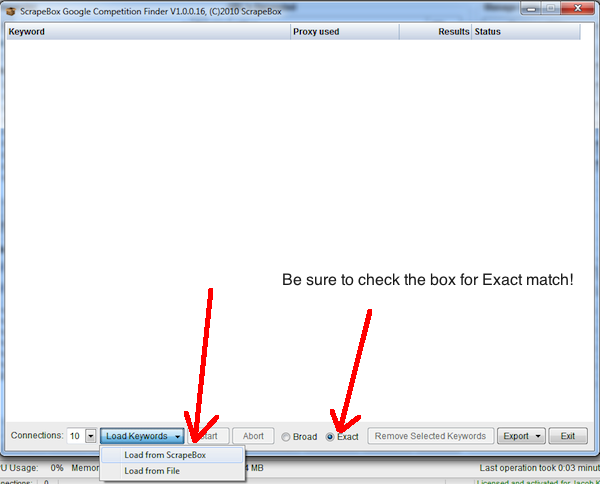
When all the results are in, click the Export dropdown, and Export content of grid as csv.

Now you will have a nice csv with all your keywords and the corresponding results. The next step is to open the grid with excel and sort the data from low to high. Delete the proxy used and status column, then click the Sort dropdown and “Custom Sort“.
Now that the custom sort screen is open, select the column with the results and sort from smallest to largest.

After you click OK you will have a nice sorted list of keywords with exact match results from low to high.
Depending on the yield I get, I will break the keywords down into ranges of exact match results.
0-50
50-100
100-500
500-1000
1000-5000
From there I will paste each range into the keyword tool, gather volume, and sort again, this time from high to low on the search volume. Then you can comb through and find some easy slam dunkable keywords.
Now this is by no means a 100% indicator of Google competition but it’s a good rough estimate. And when the number is REALLY low, it becomes a more accurate indicator of an easy to dominate keyword. This method can be extremely helpful when you have a massive list of keywords and you are trying to figure out which ones to target with some supporting content, boom, go for the ones with volume that you can easily rank for. This method will unlock those.
Chapter 5: Expired Domaining
This is by far one of the most powerful grey hat SEO areas in the game. Expired domains can hold a ton of juice, you just need to know how to find them and how to properly relaunch them. Before diving into the Scrapebox methods we will go over the basics of expired domaining.
There are three areas you can focus your domaining efforts or some combination of the three; Building a blog network, creating money sites, and link laundering.
1. Building a blog network
Building a network is one of the most powerful SEO techniques in the business. Owning a private network of over 100 sites PR 1-6 is quite nice, think about it.
Private Blog Network 101
There is nothing wrong with building a private blog network. This SEO strategy is not flawed in anyway. The only flaw is from the creator.
If you leave a footprint, that allows Google to identify the network and your network becomes useless. And like many other things, after the Google propaganda disseminated throughout the community, people deemed PBNs worthless and ineffective. But when done right, links from your private network will be just as effective as naturally occurring links on authority sites.
Main Points:
*Use many diverse IPs and hosting accounts
*Use different themes, category structures, permalinks, and www. vs root
*Vary the extensions! .com, .net, .info, .org, .etc
*Use different domain registrars with some private registrations and some with old owner’s information. Godaddy, namecheap, etc. some private and some with joe schmoe.
*Build some good links to each site.
2. Creating money sites
Occasionally you will find a nice domain that is fitting for a money site. In this case, congrats, you just found yourself an SEO time machine.
I’ve gone back as much as 10 years before and gained myself 40,000 natural links!
How about building a brand new site and working with a domain like that?!
These are rare but they’re out there. Most likely you’re going to have to pay for it in a small bidding war unless you get lucky. But if you know it’s a winner, then go for it.
Always be cautious with drastically changing the old content theme of the site. If you have a money domain about dog snuggies, figure out a way to rank and monetize it while keeping the content semantically relevant to that topic. Used effectively you will easily exceed the results from the same exact efforts on a fresh domain. Also if you get an aged domain with a diverse natural link profile you will be much safer blasting some links at the site. An existing diverse link profile can effectively camouflage grey hat link building tactics.
3. Link laundering
This is by far the dirtiest method of all when it comes to expired domaining shenanigans. With this technique we will be using our friend the 301 redirect to redirect pages, subdomains, or entire sites at the site or page we are trying to rank. Effectively sending tons of link juice while also cloaking our link profile a bit.
See Bluehatseo for more info on link laundering in the traditional way, with this technique we will be link laundering through server level redirects, specifically the 301.
Step 1. Acquire expired domain
Step 2. Relaunch domain and restore everything.
Step 3. Redirect domain via 301 redirect.
Step 3. Aggressively link build to the now redirected domain.
Here is the redirect code to use in you .htaccess file to execute the redirect:
RewriteEngine on
redirectMatch 301 ^(.*)$ http://www.domain.com$1
redirectMatch permanent ^(.*)$ http://www.domain.com$1
After you set the redirect, start blasting some links and enjoy.
Expired Domaining 101
In this section we will step away from Scrapebox a bit and discuss SEO domaining domination. But don’t worry, we will be back to Scrapebox shortly.
Buying expired domains takes some skill but it’s not rocket science. The thing is, for every good domain there is ten shitty ones out there that we must avoid.
Here is an overview of the process:
Part 1. Finding domains
Part 2. Analyzing your finds
Part 3. Smart Bidding
Finding Killer Domains with Shit Tons of SEO Juice
Ok, so Scrapebox has the TDNAM scraper addon that we are going to discuss in a moment but it is limited to only Godaddy auctions. So while this is a free addon, you are not accessing the entire expired domain market.
In order to do that you are going to have to use some sort of domaining service. These services pull expired feeds from all different sites on the web and also offer some metrics that Scrapebox does not.
Here are my recommended domaining services that I have personally used to snag domains for over 100x the initial purchase price.
Freshdrop – This is the top dog, and the price comes with. $99 per month but this is definitely the king of expired domain buying tools. If you are trying to build a network then the subscription will only be short term until you have completed all your domain buys. Recently they have added the MajesticSEO API so you can filter results by backlinks right in Freshdrop, pretty awesome.
If you can’t afford this tool then you can still land a whale on Godaddy auctions. Open the TDNAM addon and enter a keyword for domains to lookup.

At default ALL extensions are selected but you can specify between, .com, .net, .org, or .info. Click start and if you don’t already begin feeling like a boss.
After the scraper is finished, click the Export dropdown and Send to Scrapebox.
Analyzing your Domains and Confirming Their Greatness
After we pull up a list of potential prospects it’s time to take things a step further and be certain we have a winner. We will be using the following tools to validate which domains are worth purchasing.
-Scrapebox (of course)
-SEOMoz Api (sorry but for this it’s worth it)
-Ahrefs
-Archive.org
-Domaintools.com
First step is to check the pagerank of each domain prospect (if you haven’t sorted from a tool above already.
Click the Check Pagrank dropdown and click Get Domain Pagerank.
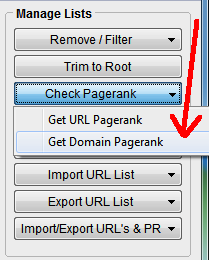
Now chuck everything with no PR.
Next open the Fake Page Rank Checker addon. This will confirm that each domains has legitimate Pagerank and not a false redirect.
Open the addon and load your list from Scrapebox. click Start, filter out the trash, and grab a beer.
Open a beer and take a nice chugg, you’re about to get an edge on your competition.
You can now scan through your domains with PR and use your judgement to identify domains with potential and that you are interested in.
But let’s put this process on steroids shall we?
Now we can use one of the newest free addons, the Page Authority addon. Using the moz api to scan DA (domain authority) and PA (page authority) we can quickly identify high quality prospects.
Since we will be using this tool several times later let’s set it up.
After you open the addon, click Account Setup and paste in your access id and api key in the following format.
Access ID|Secret Key
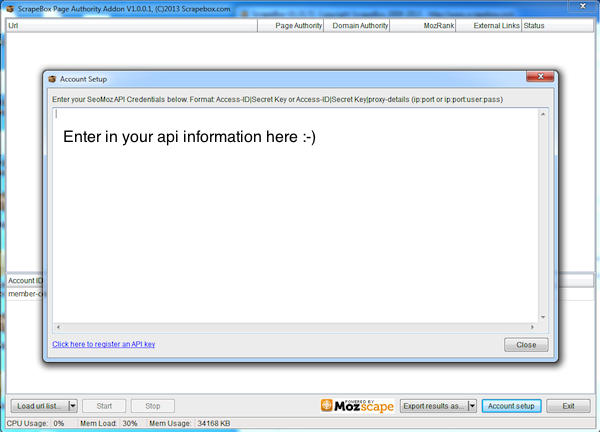
Now click Start and get some great insight from SEOMoz’s internal scoring system. Sure it’s not perfect but gives us a quick and dirty evaluation of the domain prospects. Just enough screening to allow us to move on to the next phase of analysis.
Now we need to research the history of the domains and their backlink profiles.
Domain History, What we want:
-The shorter the time frame the site has been down the better
-Make sure the domain has not changed hands multiple times. Look at the whois history via domaintools to verify this.
-Check Archive.org to see what the site used to be. Something you can roll with?
Backlink Profile, What we want:
-Take the domains you’re interested in and start putting them one by one into backlink checking tool
We want domains juiced with good links, not some piece of shit that someone blasted 10,000 viagra links at and threw out after they were done with it. You will also be able to spot an “SEO’d” link profile, just look for an abundance of keyword rich anchors or anchors with lack of natural anchor text distribution and diversity. I avoid these at all costs. Typically SEOs have no idea what they’re doing, so 99% of expired domains that previously had a “link builder” behind them will be complete shit.
Also keep an eye out for some familiar super authority links, like .govs, .edus, and big news sites. Cnet, WSJ, NYtimes, etc. A few of these areusually an indicator of a once legit domain.
Step 3: Smart Bidding
Smart bidding is a very simple process that beginners will neglect.
The process is simple, wait until the last minute and start bidding like a beast.
When you find that money domain with links from bbc.co.uk and huff po, contain your excitement and don’t go nuts quite yet.
Depending on the domain auction you’re using, watch the auction, and also set a reminder on your calendar and cell phone.
Whatever works for you, I usually set two timers, the first one hour before the auction closes, and the second 15 minutes before the auction closes.
Use the TimeandDate calculator to find the time in which the domain is going to close. Be ready and pounce.
Also keep in mind that early bidding will alert guys like me who occasionally just sort out domains by # of bids and analyze from there.
So your preemptive $50 bid just alerted me of a quality domain you found that I should throw on my calendar. Then when the time is right I strike like a hungry pit viper out for Pagerank and domain authority.
Conclusion – chill out and bid smart.
This Guide is Originally from Jacobking.com/ultimate-guide-to-scrapebox
Chapter 6: Link Prospecting
In this chapter we will be analyzing related SERPs to our keyword and looking for places to drop links. Say there is a forum powered by Vbulletin ranking on the 5th page for a relevant keyword. It would be easy to go and drop a link on that page right? First register for the forum, make a legit profile, go post a few times in other threads, then go drop a nice juicy link on an already indexed page.
Or if you’re feeling real ambitious, train a VA to run this entire process for you.
Because you see, this same methodology can be applied on a massive level by scanning for multiple platform types.
Using a list of the most popular community and publishing platforms, you should be able to create simple html footprints and scan all the urls to identify the potential link drop opportunities.
There are two main approaches that we can use this technique for.
1. Simply analyzing urls related to the target keyword for link dropportunities (see what I did there).
2. Performing deeper analysis on targeted scrapes
For both methods we will be using the page analyzer plugin to analyze the html code of all the pages we dig up.
Method #1 – Find Ranking Related Link Dropportunities
Start by scraping a bunch of keyword suggestions closely related to your target keyword.
Set the results to 1,000 and harvest.
Remove dupe urls and open the page scanner addon.
Once the page scanner is open you will need to create the footprints for it to scan with.
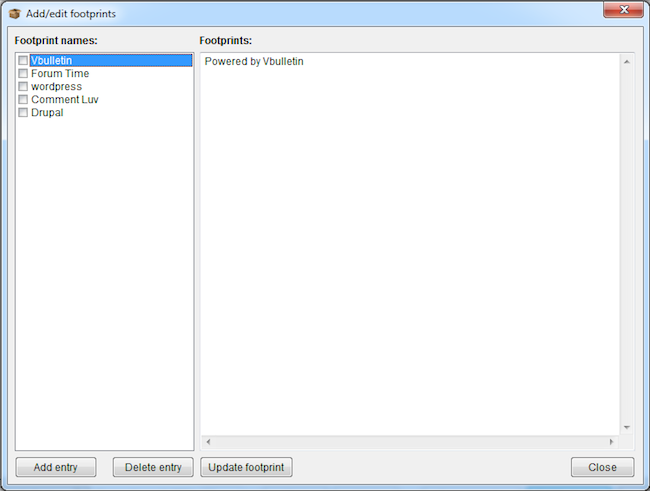
Here are some example footprints:
Platform – WordPress
wp-content
Platform – Drupal
Platform – Vbulletin
Platform – General Forum
All times are GMT
Note that these footprints are different than the traditional footprints we are building when scanning for onpage text. We are taking it one step further and scanning the actual source code of the returned pages for a common html element. If you invest the time, you can build extremely accurate footprints and basically find any platform out there.
After you have inputted the footprints and run the analyzer, export your results. All of the results will be exported and named by the footprint name. So your Vbullletin link dropportunities will all be one file name Vbulletin.
Now continue your hunt and perform further link prospecting analysis on the page level.
Check PR, OBLs PA/DA, etc. When completed you will have a finely tuned list of relevant potential backlink targets to either hand over to a VA or run a posting script on.
Method #2 – General Page Scanning for Targeted Link Dropportunities
With this method I’m going to show you an actual exploit that I discovered the other day to clearly explain this technique.
We are going to be finding blogs with the Comment Luv platform and do-follow links enabled.
All you will need is a few bogey Twitter accounts to tweet the post and get a choice of the post you want to link to.
*Note – This technique requires your site having a blog feed.
 To start we are going to be using an onpage footprint to dig up these potential comment luv dofollow drops.
Here is the footprint I created, a common piece of text found right by the comment box, comes default on all Comment Luv installs.
“Confirm you are NOT a spammer” “(dofollow)”
And a bit of SEO irony there!
Now save that badboy to a txt file as “Comment Luv Footprint” or something dear to your heart.
Bust out the keyword scraper and start scraping a shit ton of related suggestions.
Now click the M button and merge that beast in with all your freshly scraped keywords. Click start and get ready to unleash the hogs of war.
When the results are in, remove dupes, and open up the page analyzer addon.
Now create a new footprint called “Comment Luv”
And here is the Gem of an html footprint that my buddy Robert Neu came up with.
Sorry code wrap not working, check back later.
Thanks Robert!
Now run the analyzer and you’ll have some crisp comment luv enabled dofollow blogs to go link drop your face off.
Hopefully you are starting to see the potential of the page scanner and the wheels are turning. Maybe an evil laugh also?
Chapter 7: Guest Posting
Contributed by Chris Dyson from TripleSEO.com
If you want to find link building opportunities beyond blog comments, then you can use Scrapebox for its primary function which is scraping search results on an industrial scale.
A lot of white hat SEO blogs tell you to run individual searches in Google for inurl:”write for us” + Keyword and use free tools to scrape up to 100 links at a time.

This is a sure fire way to:
a) Get your IP blocked by Google
b) Bore you to death
c) Waste your time and money
d) Did I say bore you to death?
Thankfully Scrapebox will come to the rescue here to save your sanity.
#1 – Load up your list of footprints into a custom list in Scrapebox
If you are not sure what to do here please refer back to the “massive scraping section”
#2 – Go grab another cold beer from the refrigerator

Jacob’s office on a Monday Morning
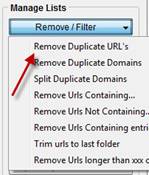
# 3- Now we want to remove any duplicate URLs, in the Remove/Filter drop down you want to select “Remove Duplicate URL’s” and then “Remove Duplicate Domains”
# 4 – Look up the PageRank
# 5 – Export the results and hand our list over to the VA to check the website is of suitable quality. You also want them to locate the blogs contact information such as name, email address/contact form and whether the site meets the criteria we have for the project.
If you haven’t got a web researcher then create a job listing on an outsourcing site such as oDesk to have the links checked against your requirements.
Here is a useful outsourcing guide from Matt Beswick
# 6 – Once your list is cleansed you want to upload the information in to your CRM of choice and start outreach
Common Guest Blogging Footprints
Here is a list of common guest blogging footprints to get you started for free…
- guest blogger wanted
- guest writer
- guest blog post writer
- “write for us” OR “write for me”
- “Submit a blog post”
- “Become a contributor”
- “guest blogger”
- “Add blog post”
- “guest post”
- “submit * blog post”
- “guest column”
- “contributing author”
- “Submit post”
- “submit one guest post”
- “Suggest a guest post”
- “Send a guest post”
- “contributing writer”
- “Submit blog post”
- inurl:contributors
- inurl:”write for us”
- guest article OR post”
- add blog post
- “submit a guest post”
- “Become an author”
- submit post
- submit your own guest post”
- “Contribute to our site”
- “Submit an article”
- “Add a blog post”
- “Submit a guest post”
- “Guest bloggers wanted”
- “guest column”
- “submit your guest post”
- “guest article”
- inurl:”guest posts”
- “Become * guest writer”
- inurl:guest*blogger
- “become a contributor”
Beyond Guest Posting
As you can imagine any search query can be added to Scrapebox to harvest URL’s for Link Prospecting for example:
- Sponsorships
- Scholarships
- Product Reviews
- Discount Programmes
- Resource Lists/Link Pages
It’s quite easy to load your footprints for these types of link building opportunities into Scrapebox and build some high authority links on these types of pages.
- keyword + inurl:sponsors
- keyword + inurl:sponsor
- keyword + intitle:sponsors
- keyword + intitle:donors
- keyword + intitle:scholarships site:*.edu
- keyword + intitle:discounts site:*.edu
- “Submit * for review”
- keyword + inurl:links
- keyword + inurl:resources
If you are an experienced link builder then you can use other add-ons in the Scrapebox tool-belt to find broken links or help webmasters fix malware issues on their site.
Chapter 8: Comment Blasting
No Scrapebox guide would be complete without a legit walkthrough on comment blasting.
I know what you’re thinking, comment blasting is so 2006.
Well it is, but only on the first tier. I recommend using blog comment blasts as a third tier link more for force indexing.
Since you are dropping comments on indexed and sometimes regularly crawled pages by Google, they will crawl your comment link back to whatever tiers you have are linking to thus indexing it.
As in most cases with link blasting, it’s all in the list. So you need to be sure you have a decent auto approve list and aren’t swimming in the gutter too much.
The big determinant is # of outbound links (OBLs) and pagerank. The less OBLs and higher the PR the better. The thing to be cautious of is if you don’t deeply spin your comments they will leave an awful footprint which can easily be found with a quick Google search using a chunk of your comment output in quotes.
And you can bet your ass if I can dig it up with a few queries than those PHD having algorithm writing sons of bitches can too. So keep your game tight.
Here is what you need to run a comment blast:
*Spun Anchors
*Fake Auto Generated Emails
*List of Websites for Backlinking
*Spun Comments
*Auto Approve Site List
Spun anchors – To prepare your anchors use the scrapebox keyword suggestions. Select all sources and scrape a shit ton of keywords. The more comments you plan to blast, the more anchors you should scrape. Get at least a few hundred.
Save this file as names.txt
Optional – Mix in some generic anchors in your list. Simply paste your keyword rich anchors into excel and count them, then paste in the desired quantity of generic anchors.
Fake Emails – Under the tools tab you will see “Open Name and Email Generator“, open that little gem.
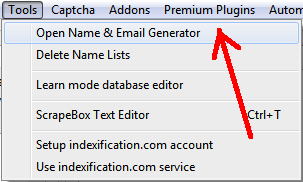
After you get this little beauty opened up, type 100,000 in the quantity field, check “Include numbers in emails” and select Gmail under the dropdown for “Domains for emails @”
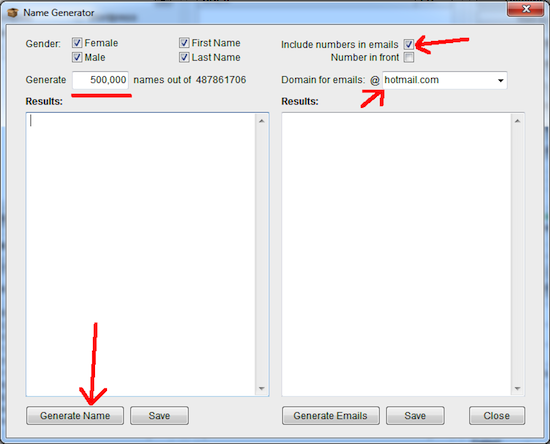
After you generate the 100,000 names, just click generate emails, save them as emails.txt and you’re good to go.
List of Websites for Backlinking – If you’ve already built links, check them with the link checker, and save those as websites.txt.
Spun Comments – Generating spun comments is actually quite simple. We will simply grab comments from relevant pages and spin them together.
In the scrapebox harvester, check the WordPress button.
Take you relevant keywords from before and surround them with intitle:”your keyword”
*Click start harvesting
*Remove duplicates urls when completed
*Click on Grab, Grab comments from harvested URL list
*Tick Skip comments with URLS
*Select to Ignore comments with less than 10 words and URLs in them
*Click Start
Now open your favorite text editor and find and replace the page breaks with a space.
For spinning we will be using theBestSpinner.
Copy and paste the exported comments into TheBestSpinner and Click Everyone’s Favorites
*Select Better from the dropdown
*Uncheck Replace Everyone’s Favorites inside spun text o Tick Keep the original word found in the article
*Uncheck Only select the #1 best synonym
*Spin levels All to All with max synonyms set to 4
*Click Replace
*Once complete, highlight all, and select the Spin Together button
*Click do not include a blank paragraph
Congratulations, you have some spamtacular comments ready, save them as comments.txt
Auto Approve Site List – Trying Googling some shit like “scrapebox auto approve list”. Have yourself a field day, gather up a ton of lists, and open Duperemove.
Place all the AA list in one folder, select them all and merge together into one monster list. Remove dupe urls and it’s time to blast away.
Blast Settings:
First you need to get your setting right. Under the Settings menu, go to “Adjust Timeout Settings”.
Move the Fast Poster time out to max, 90 seconds. This way the poster will be able to load massive pages with tons of comments and slow load times without timing out.
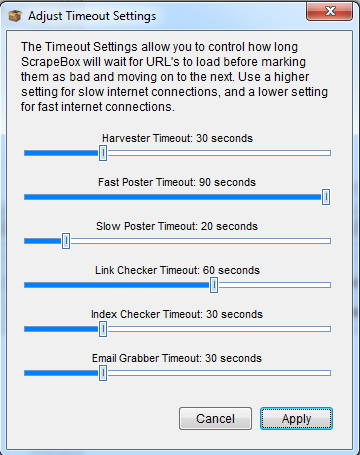
Check the “Fast Poster” box. And begin opening each of the files you created from above. Names, Emails, Target Websites, Comments, and AA list all in txt format.
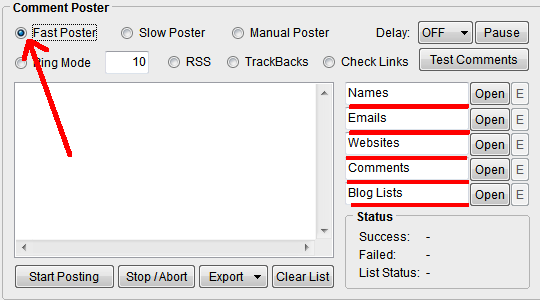
Click Start Posting and open beer. Drink beer and continue reading this guide.
Chapter 9: Niche Relevant Comments
Contributed by Charles Floate
There’s a cool thing you can do with ScrapeBox to make highly approved and more specifically niche relevant comments.
Preparing Comments
Firstly, you’re going to need to make 3-5 different comments per 500 harvested URLs around the same topic.
For example if you’re link building for white hat SEO I could make a comment like:
“Content has always been king, seems the black hats are getting destroyed by the white hat profit making machines”
Then, you need to “spin” the comment, by spin I mean manually spin the comment.
An example of the above comment, manually spun would be:
“{Content|Information} {has always been|has long been|has become} {king|master}, {seems|appears} {the|all the|all of the} {black hats|black hat’s} {are getting destroyed|are getting owned|are getting own} {by the|from the} {white hat profit making machines|white hat profit makers|white hat profiteers}.”
As you can see, it’s perfectly readable in all ways and these kind of comments tend to have a pretty high approval rate.
There’s a few different styles I like to incorporate into my strategies that can boost up both the diversity and the approval rate.
Ego Approval Bait:
This is based on the ego of the writer, I’ve been trying to come up with a solution to add a name to the comment but only looks like I can do this with Xrumer, and this tutorial isn’t based on Xrumer is it ;)
Example Ego Bait Comment:
Always a pleasure to read your content, seems you really do have a talent for creating great content!
(As a split test, adding the exclamation mark increases approval rate by 6%!)
Social Approval Bait:
These tend to be based around asking about social mentions, ask the author how you can connect with them on Twitter for example.
Website Approval Bait:
This is based on the fact that you’re complementing the design (and if you’re posting only to WordPress sites, you already know the answer).
Example Website Bait Comment:
Site’s design is really nice, is it a custom theme or can I buy or download the WP theme from somewhere?
Harvesting
Now once you have all the comments ready, you’re going to want to search for sites related to the niche you’re building for:
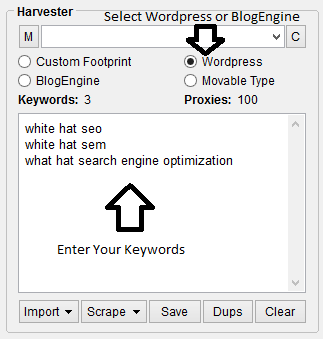
Selecting WordPress will find all the WordPress blogs out there, this is great if you just want to build niche relevant nofollow comments, selecting BlogEngine will find tons of different blog CMSs, some being dofollow.

Posting Comments
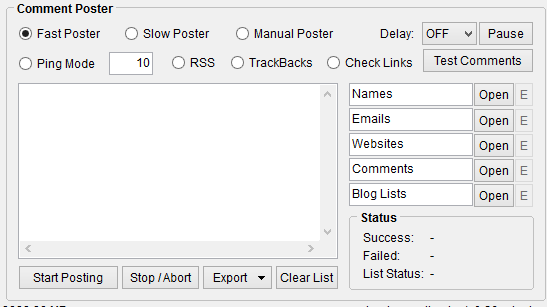
Once all your comments are harvested, you are ready to post.
Names:
In the Names Area, you need to open a text document with your anchor texts, I always create a mixture of branded, generics and some LSI/Longtail keywords.
Emails:
In the emails section, either put your actual email (This a lot of the time will receive an email about replies, comment approvals or declines) or just input a list of randomly generated emails so your email doesn’t get flagged for spam.
Websites:
In the websites list, just input your websites you wish to build links to.
Comments:
In the comments section, open the text document with all your manually spun comments.
Blogs List:
In the blogs list, add in the harvested blogs, this is pretty easy as you can just click: Lists > Transfer URL’s to Blogs Lists for Commenter.
Make sure you select the Fast Poster. Now click start, it’s as easy as that!
FIRE!!!

Chapter 10: PageRank Sculpting
PageRank sculpting, say it, Matt Cutts won’t hear you. Now if you sculpt like a pro, then that dumbass Algo won’t have a clue either. There are many ways to approach PR sculpting, some methods are more aggressive than others such as pointing the majority of your posts, homepage, and category pages at the target you want to rank. My method isn’t quite as risky, actually if done right it’s not risky at all, it’s SEO 101.
We will be analyzing all of your indexed urls and making sure we have taken advantage of all relevant internal link opportunities. This can also be handy for client audits, it’s a quick and easy win.
There are two methods you can use to gather your site’s urls.
1. Use the harvester and the site: command.
2. The sitemap scraper addon, this is necessary for large sites with over 1,000 indexed urls. With this addon you can scrape XML sitemaps.
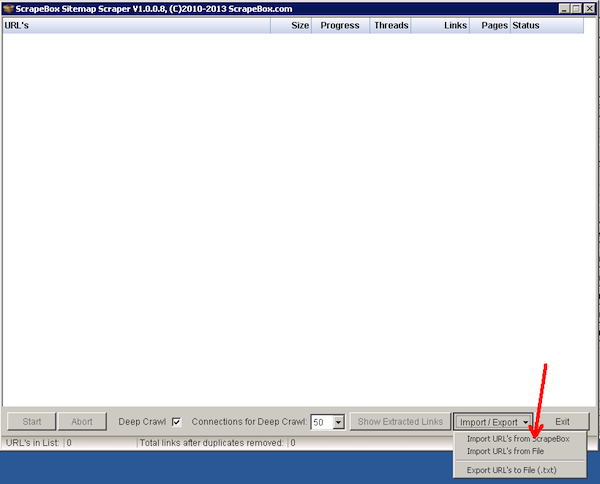
After you gather the urls, simply run a PR check and save all the URLs with PR. Then open the Page Authority Addon if you have the Moz API setup, and analyze each URL. Export to CSV then sort by Page Authority, Moz Rank, or External links to identify your highest juiced pages.
No don’t go dropping heavy anchor text links all over the place like a link happy freak or anything. Be smart about it. Use varied anchors and only where it makes sense. Weave it in naturally not like a drunk Scrapebox toting lunatic. If you find relevant places to drop, do it up.
And don’t go linking to your homepage a bunch of times rook.
Chapter 11: The Automator
Ok, so not only is Scrapebox the most badass SEO tool ever created in almost every aspect, but you can also automate most tasks.
And for a whopping $20 this premium plugin can be yours. Under the tab, click Available Premium Plugins, purchase the plugin through paypal and it will be available for download.
This is where you are going to need to use you imagination. With the automator you can easily string together huge lists of tasks and effectively automate your Scrapebox processes. The beauty of the automator is not only it’s effectiveness but it’s ease of setup. Very low geek IQ required, simply drag and drop the desired actions, save, and dominate.
As an example I will walk through setting up a series of scrapes.
Say you have multiple clients to harvest some link partner opportunities for. You can literally set up 20 and walk away. Come back to freshly harvested and PR checked URLs.
We would start by preparing our keywords, merging with footprints, then saving them all into a folder. Client1, Client2, Client3, etc.
Now open the Automator.
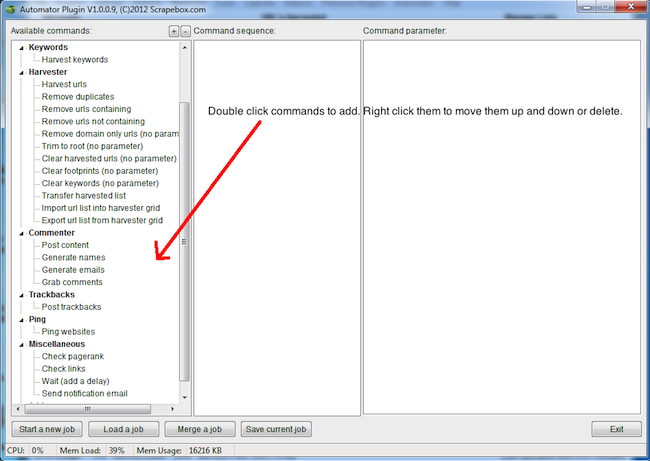
Here is the sequence we would use:
Harvest Urls, Remove duplicates, Check Pagerank, clear, wait a few seconds, and repeat. The screenshot below shows three loops.
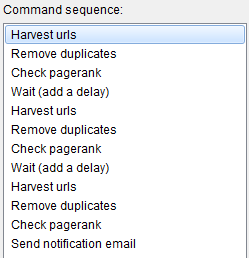
After you add the commands, filling out the details should be easy to figure out. You’ll notice I put a wait command in between each loop, just set that to 5 seconds to let Scrapebox take a quick breath between harvests. I also added the email notification command at the end which is the icing on the automator cake.
Chapter 12: Competitor Backlink Analysis
To do this right you are going to need some sort of backlink checking service. Ahrefs, Majestic SEO, or Moz Opensiteexplorer will do.
If you have multiple services, you can use all of them and remove dupes. Yes, this is a bit crazy but will get as many of your competitor’s backlinks as possible.
Now in classic Scrapebox fashion we are not going to just look at one competitors backlinks, we are going to look at them all. Take your top 10 competitors, export ALL of their backlinks and merge together.
Once you get all the links exported and pasted into Scrapebox, you can began analysis.
We can collect the follow information on our competitors links:
URL or Domain PageRank
Moz Page and Domain authority
Moz External links
Social shares
Anchor text
IP Address
Whois info
Platform Type
Dofollow/nofollow links
We can approach this in two ways:
1. Get links from the same places as our competitors.
2. Get a clear picture of what is working for sites currently ranking so to replicate it.
So let’s start with approach one, snagging competitor link opportunities. From here you will be able to break down your competitors links in many ways. This is where we can use our link prospecting techniques via the page scanner addon and spot some easy slam dunk link opportunities. Thanks competitors!
Depending on your niche, you might be able to pick up some nice traffic driving comment links here as well. Bust out the blog analyzer and run all the links through that, it will identify blogs where your competitors have dropped links. Sort by PR and OBLs, viola you’ve got some sweet comment links.
Approach Two, What’s working now…
One of the most powerful SEO tactics around and one that will always live is reverse engineering competitor backlinks to see what is currently working in the SERPs.
There is no one size fits all approach, so understanding what’s ranking the site currently that you’re trying to outrank is key.
Sure finding relevant link opportunities and matching your competitors links is huge, but understanding what Google is favoring is the insight you need.
Using the live link checker you can take the links and check the exact anchor text percentages they are using. Since the “sweet spot” can be niche specific with our pal Google, this is a necessary approach for SERPs you’re very focused on.
This is done on a site by site basis. Start by taking the top ranking site’s backlinks and saving them into a txt file, backlinks.txt
Then create an additional txt file with nothing but the competitors root domain, save that as Backlink-target.txt
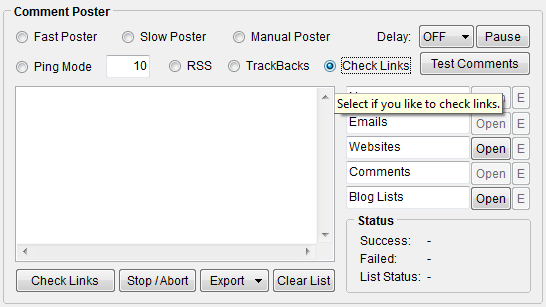
In the comment poster section, tick the box “Check Links”.
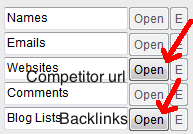
Now in the Websites field open the Backlinks-target.txt file with your competitors homepage url. Then in the Blog Lists field open the text file with all of the backlinks, backlinks.txt.
Click check links, let roll, then export as csv.
Open the file and sort the anchor text column fro a-z. From here you can easily see the % distribution of their anchor text. Take the number of occurrences and divide it by the total backlinks. Boom, you know exactly what the anchor text percentage is for the currently top ranking site. Use that information how you will.
Now we could continue to go wayyyy more in depth on competitor links and how to leverage this intelligence in hundreds of different ways but I’m running out of gas here. The best way to learn this stuff is by getting your hands dirty. So bust open your backlink checkers, roll up your sleeves, and fire up Scrapebox already.
Start making your competitors wish they would have blocked the backlink crawlers like you did. Well, hopefully ;-)
This Guide is Originally from Jacobking.com/ultimate-guide-to-scrapebox
Chapter 13: Free Scrapebox Addons
Social Checker – Bulk check various social metrics; Facebook, Google +1, Twitter, LinkedIn, and Pinterest. Results can be exported in multiple formats, .xlsx, .xls, .csv, .txt, .tsv, and others. Also supports proxies.
Unicode Converter – Convert text in different languages such as Chinese, Russian, and Arabic into an encoded format that cane be used in the Google URL harvester keywords and footprints inputs.
Backlink Checker 2 – Download up to 1,000 backlinks for a URL or domain via Moz API.
Google Cache Extractor – Fetch the exact Google cache date for a list of URLS and export the URL and date.
Alive Checker – Take a list of URLs and check the status of the website, alive or dead. You can also customize what classifies dead urls by adding response codes like 301 or 302. Will also follow redirects and report the status of the final destination URL.
Alexa Rank Checker – Check Alexa rank of your harvested urls.
Duperemove – Merge multiple files together of up to 180 million lines and remove dupes. Work with enormous files and split results however you’d like.
Page Scanner – Create custom footprints as plan text and html, then bulk scan URL’s source code for those footprints. You can then export the matches into separate files.
Google Image Grabber – Harvest images directly from Google image search in small, medium, and large outputs.
Rapid Indexer – Submit your backlinks to various statistic, whois, and similar sites to help force indexing.
Audio Player – Bump some tunes while you scrape.
Port Scanner – Display all active connections and corresponding ip addresses and ports. Useful for debugging and monitoring connections.
Article Scraper – Scrape articles from different article directories and save them as txt files.
Dofollow Test – Load in a list of backlinks and check if they are Dofollow or Nofollow.
Bandwith Meter – Displays your up and downstream speed.
Page Authority – Gather page authority, domain authority, and external links for bulk URLs in the harvester.
Blog Analyzer – Analyze URLs from harvester to determine blog platform (WordPress, blogengine, moveable), comments open, spam protection, and image captcha.
Google Competition Finder – Check the number of indexed pages for given list of keywords. Grab either broad or exact match results.
Sitemap Scraper – Harvest urls directly from sites XML or AXD sitemap. Also has “deep crawl” feature where it will visit all urls on the sitemap and identify and URLs not present in the sitemap.
Malware and Phishing Filter – Bulk detect websites containing malware, or that have contained malware in the last 90 days.
Link Extractor – Extract all the internal and external links from a list of webpages.
Blogengine Moderated Filter – Scan large lists of BlogEngine blogs and determine which are moderated and which are not. Then load into the fast poster and blast away.
Domain Resolver – Resolve a list of domain names to the IP addresses(s) they are hosted on and check location.
Outbound Link Checker – Easily determine how many outbound links each URL in a list has and filter out entries over a certain threshold.
Mass URL Shortner – Shorten massive URLs using some common shortening services such as tinyurl.
Whois Scraper – Retrieve whois entries from harvested URLs, get names, emails, and if available, domain creation and expiration date.
TDNAM Scraper – Harvest soon to expire domains straight from Godaddyauctions.
ANSI Converter – Export URLS from harvester as unicode or UTF-8 to use Learning poster in other languages.
Fake PR Checker – Check fake Pagerank of harvested urls.
Chess – Play chess, it’s good for the mind.
Chapter 14: The END
Final Thoughts and General Ass Kicking Advice
Now that your eyes have been opened to the power of Scrapebox you might find yourself in brief SEO shock. My hope is that not only will you see the benefits of Scrapebox but this will also change the way you look at playing the game we call SEO.
If you are guilty of manually combing through Google SERPs for link opportunities then I will forigve you if you promise to change your ways.
The data is at your finger tips, leave no stone unturned and don’t let something silly like Google’s 1000 result limit stop you. One of the prerequisites to being a “good” SEO is being able use search engines better than any other human can. And without some sort of scraping tool you’re going to get your ass handed to you.
There are always ways to improve your processes, even when you think you have it mastered and 100% optimized. SEOs neglecting the power of Scrapebox is just one example. Keep your eyes open and get money!
Wow, you made it to the end, good job. Now as a reward you can download this massive list of footprints. Yup it just keeps getting better and better.
